- Requirements
- Theme Installation
- Importing Demo contents
- Theme Features
- Layout Settings
- Layout Settings for Individual Post Types
- Blog Settings
- Post Settings
- Error Page Settings
- Breadcrum Setting for custom post type
- Trainer
- Class
- Gallery
- Testimonial
- Elementor elements
- Built-in CSS Classes (Advanced)
- Custom Widgets
- Special Tutorials
- Troubleshooting
- Contact
Fitness | Responsive WordPress Theme Documentation
1| Requirements
You need at least WordPress version 4.9+ installed for this theme to work properly. It is strongly recommended that you always use the latest stable version of Wordpress to ensure all known bugs and security issues are fixed. Other requirements:
- PHP version 5.3 or greater. But for maximum speed, we recommend to use PHP version 7+.
- MySQL version 5.0.15 or greater.
2| Theme Installation
When you are ready to install a theme, you must first upload the theme files and then activate the theme itself. The theme files can be uploaded in two ways:
- FTP Upload: Using your FTP client, upload the non-zipped theme folder into the /wp-content/themes/ folder on your server.
- WordPress Upload: Navigate to Appearance -> Themes -> Add New -> Upload. Go to browse, and select the zipped theme folder. Hit "Install Now" and the theme will be uploaded and installed.
Once the theme is uploaded, you need to activate it. Go to Appearance -> Themes and activate your chosen theme.
After that you need to install and activate the following pre-packaged plugins:
- Fitness Core: Required and must install plugin.
- RT Framework: Required and must install plugin.
- Redux Framework: Required and must install plugin.
- Breadcrumb NavXT: Required and must install plugin.
- RT Demo Importer: Required if you want to import demo contents. You can deactivate it after demo is imported.
- Elementor: Recommended. Page builder plugin.
- WP Extended Search: Recommended. Install if you want to include/exclude certain post types in search result page.
- Contact Form 7: Optional. Install if you want to use contact form.
- WP Retina 2x: Optional. Install if you want your site to be retina ready.
N.B: All plugins must be installed and activated if you want your site to look exactly like demo.
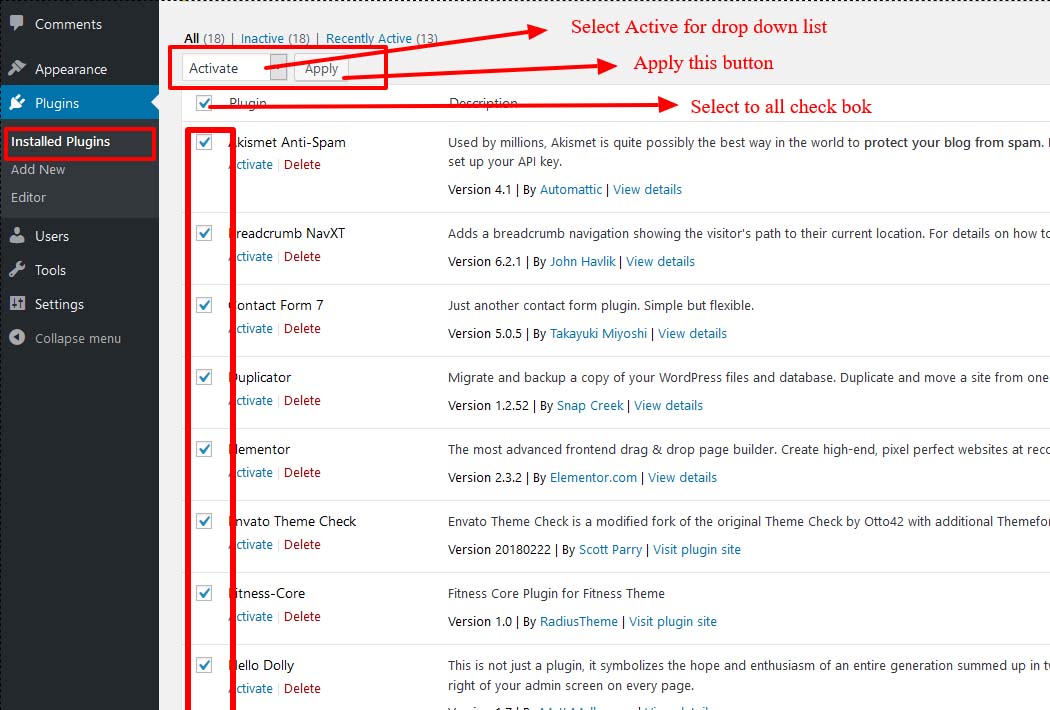
To install these plugins, navigate to Appearance -> Install Plugins and start installation.
3| Importing Demo contents
Want to build your site like the demo? You can do it by only one click!
** Note: Before proceeding, please remember that when you are done with the demo import, all existing settings and contents will be removed and replaced by the demo contents. So it is highly recommended that you should only do this in fresh site. **
First please make sure that Fitness Parent Theme is activated on your site.
From Admin menu, navigate to Tools -> Demo Content Install. Or alternatively, navigate to Plugins -> RT Demo Importer -> Install Demo Contents.

In this page, Click on the Install button for installing the demo.

It will take some time for importing the demo contents. Please note: Some images are replaced with a placeholder image because of licensing.
After importing demo data, please update your permalink. To update permalink, navigate to Settings -> Permalink and then click on Save Settings button.

If you face any issue, check the Troubleshooting section from here.
4.1| Sitewise Colors
From Admin menu, navigate to Appearance -> Theme Options. Then go to Colors tab.
Choose your preferred primary and secondary color from the color palette.
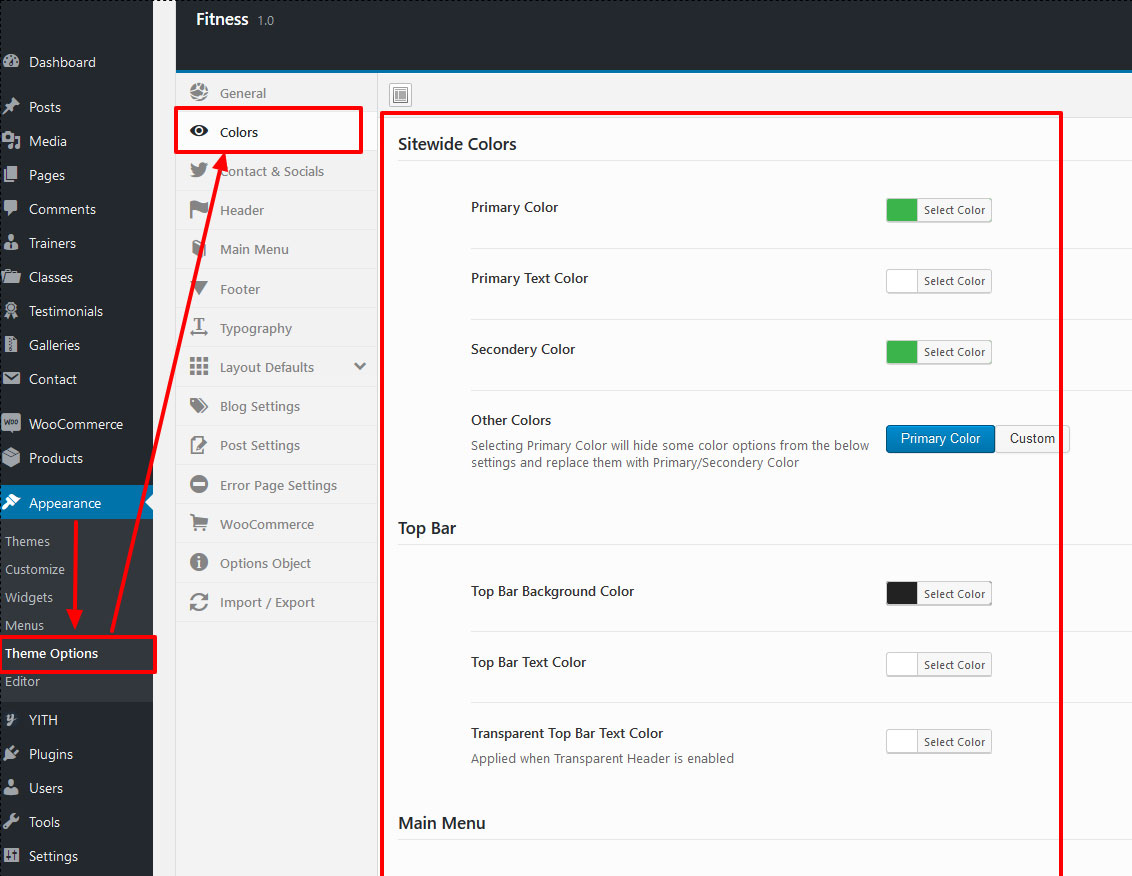
After changing the settings, Click on Save Changes button.
4.2| Logo
From Admin menu, navigate to Appearance -> Theme Options. Then go to Header tab.
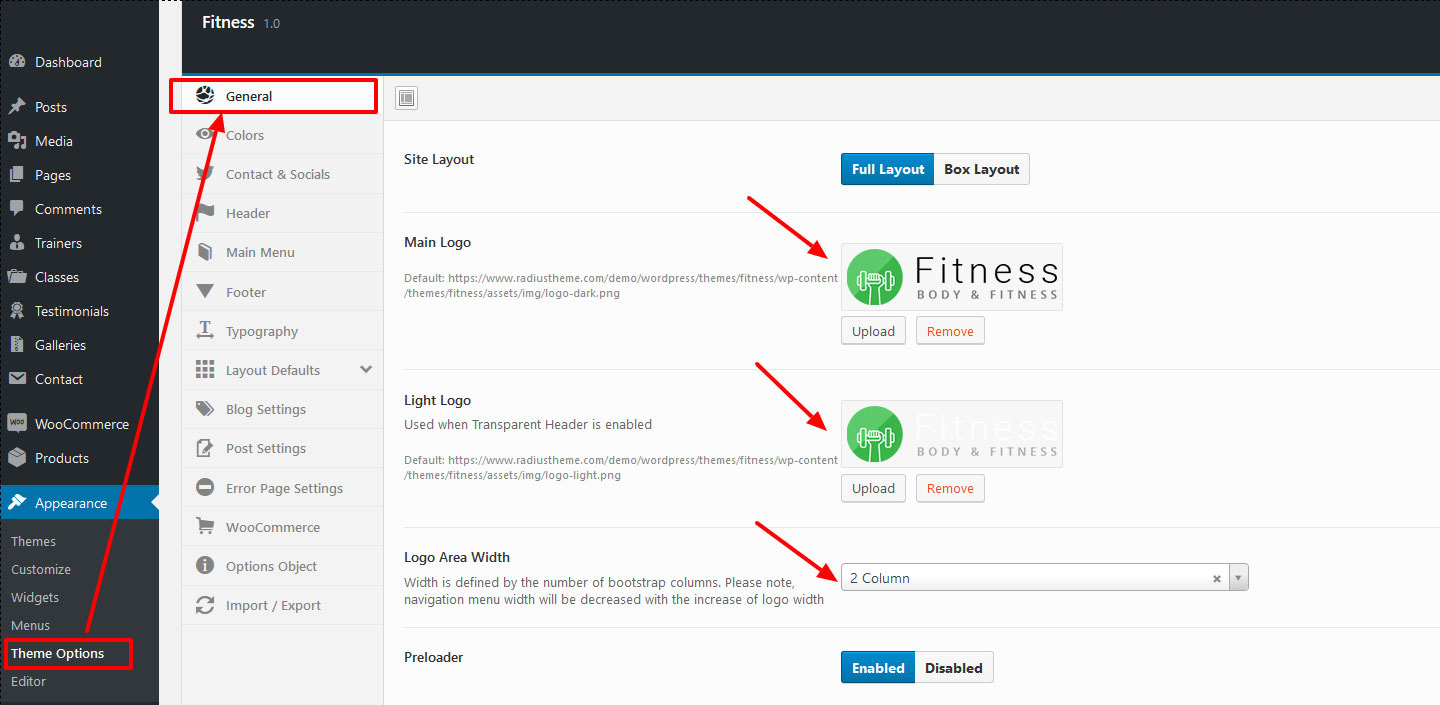
After changing the settings, Click on Save Changes button.
4.3| Preloader
From Admin menu, navigate to Appearance -> Theme Options. Then go to General tab
Here you can find the option for enabling/disabling "Preloader" option. Also you can upload your custom preloader image. When uploading image, make sure it's a transparent GIF image.
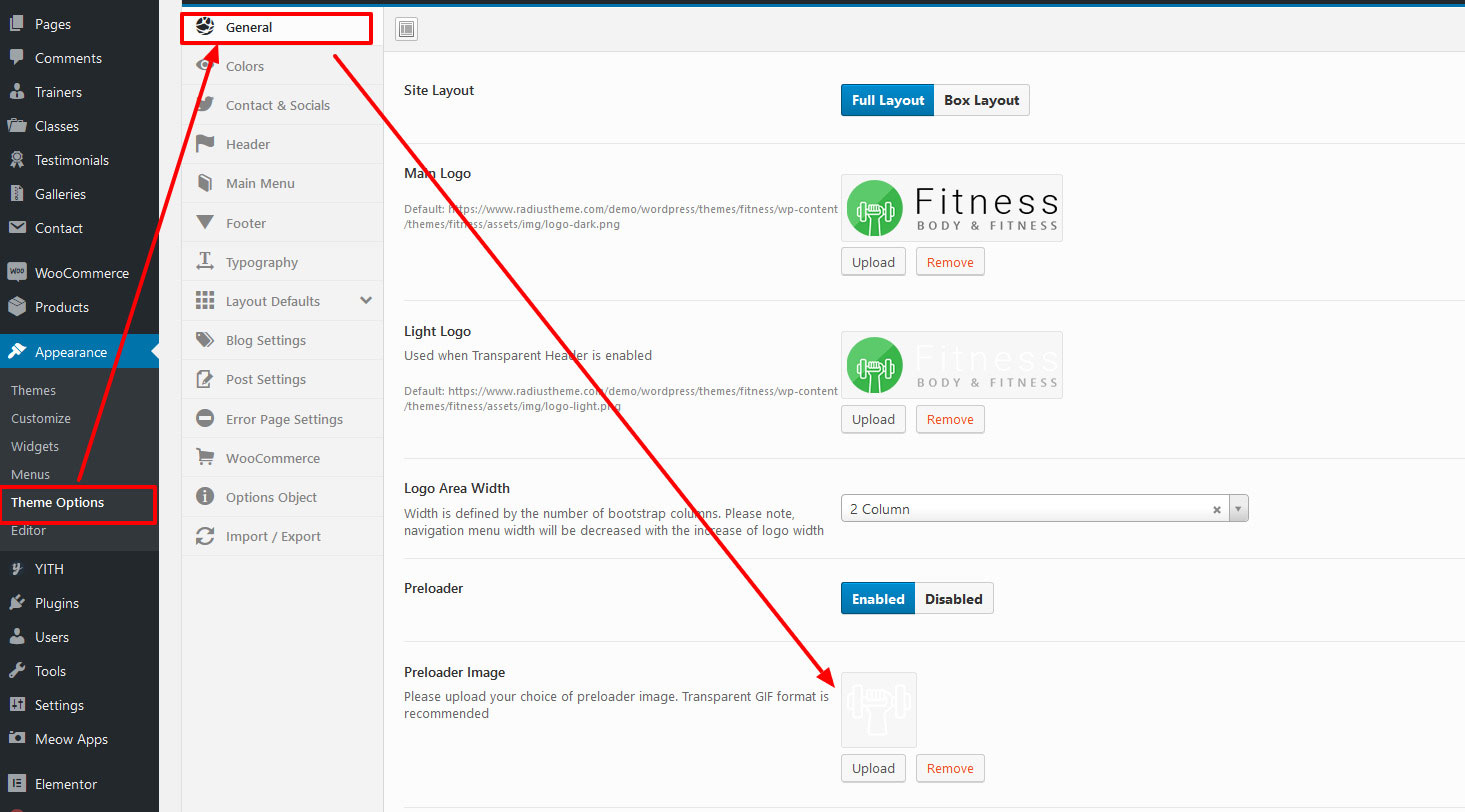
After changing the settings, Click on Save Changes button.
4.4| Back to Top Arrow
From Admin menu, navigate to Appearance -> Theme Options. Then go to General tab
Here you can find the option for enabling/disabling "Back to Top Arrow" option. Choose your preferred option
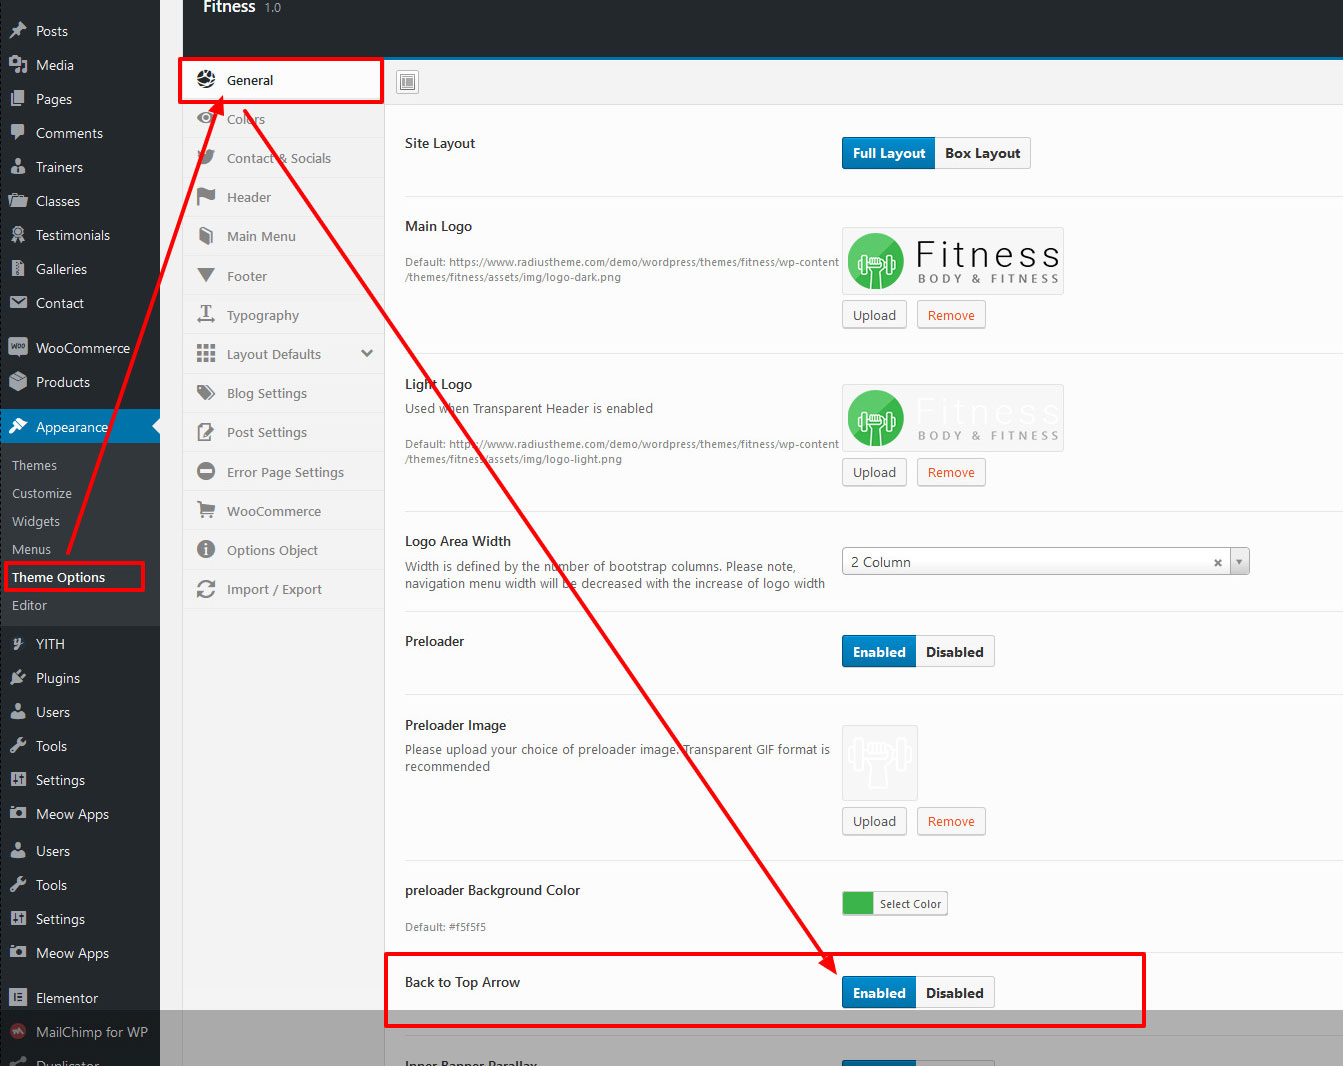
After changing the settings, Click on Save Changes button.
4.5| Header and Top Bar
To change the Header related settings, please go to Appearance -> Theme Options. Then go to Header tab. Following features are available:
- There are total 5 Header Layouts. You can choose your preferred layout combinations from here. You can change this settings from any individual pages too.
- You have options to enable/disable Sticky Header.

After changing the settings, Click on Save Changes button.
4.6| Menu
To customize the menu settings, navigate to Appearance -> Theme Options. Then go to Main Menu tab.
From here you can change the menu display behaviour. You can set menu fonts and Mobile menu Width as well.
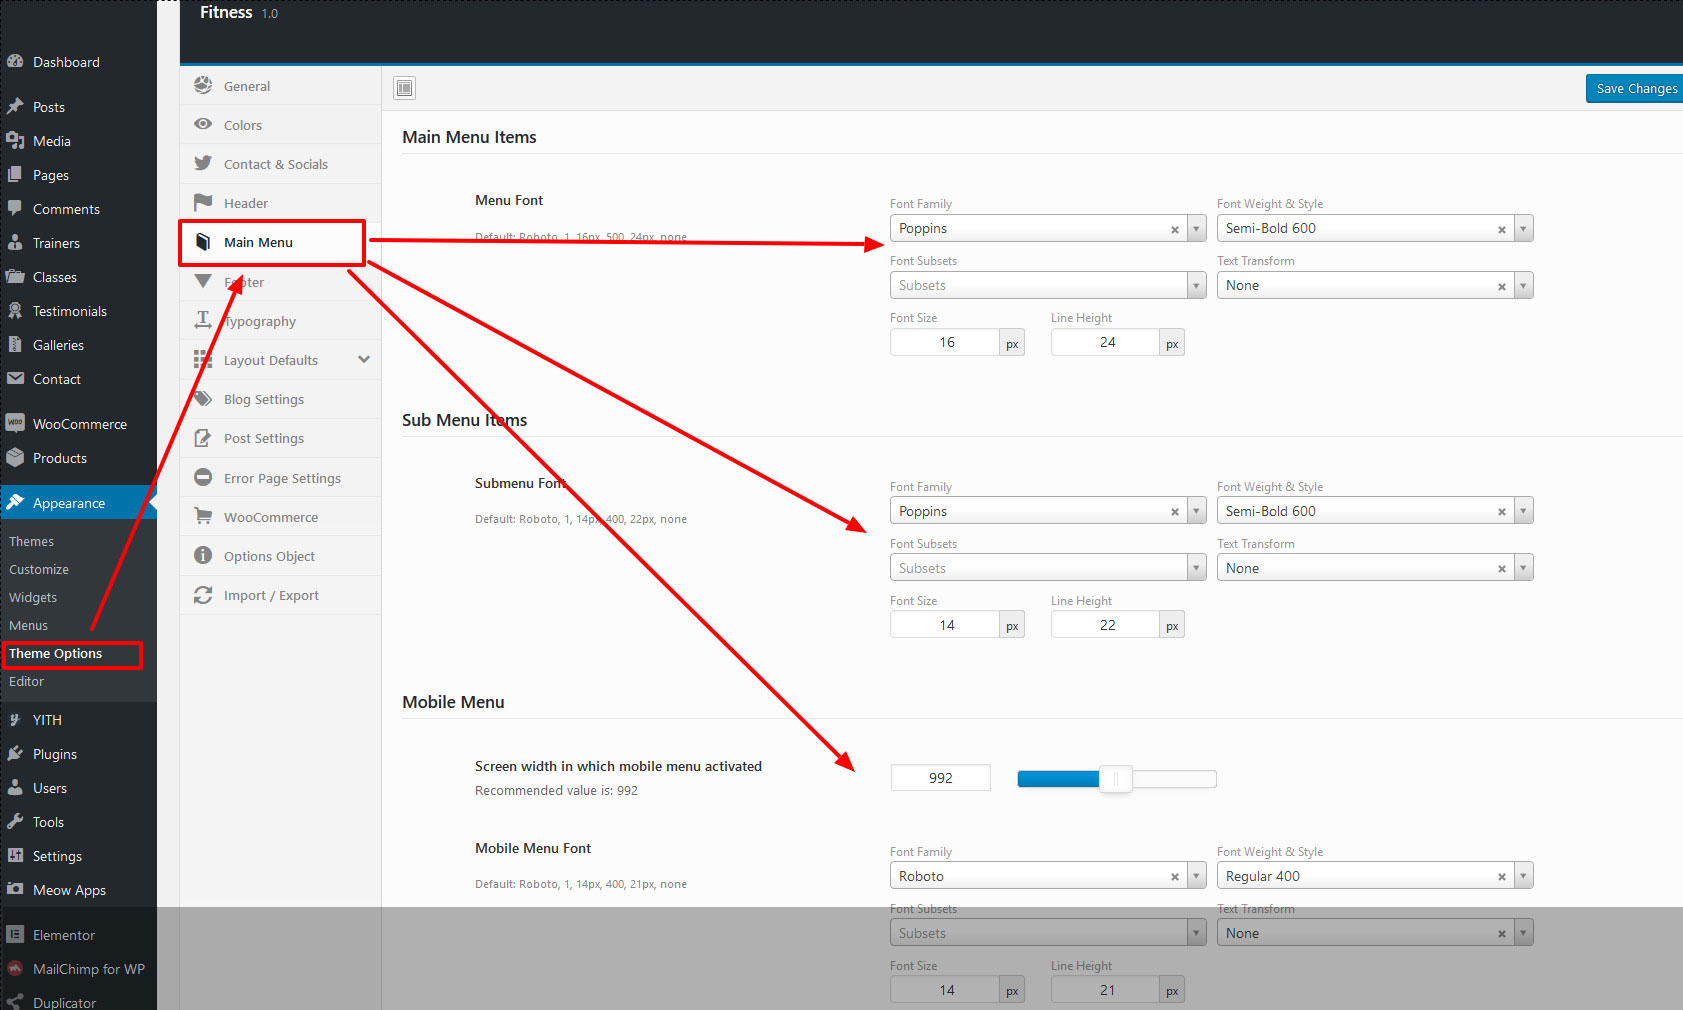
After changing the settings, Click on Save Changes button.
4.7| Multi Column Menu
Multi column menu looks like this:
To make any menu item multi column, you have to add some specific classes in the parent menu item. Here's an example:
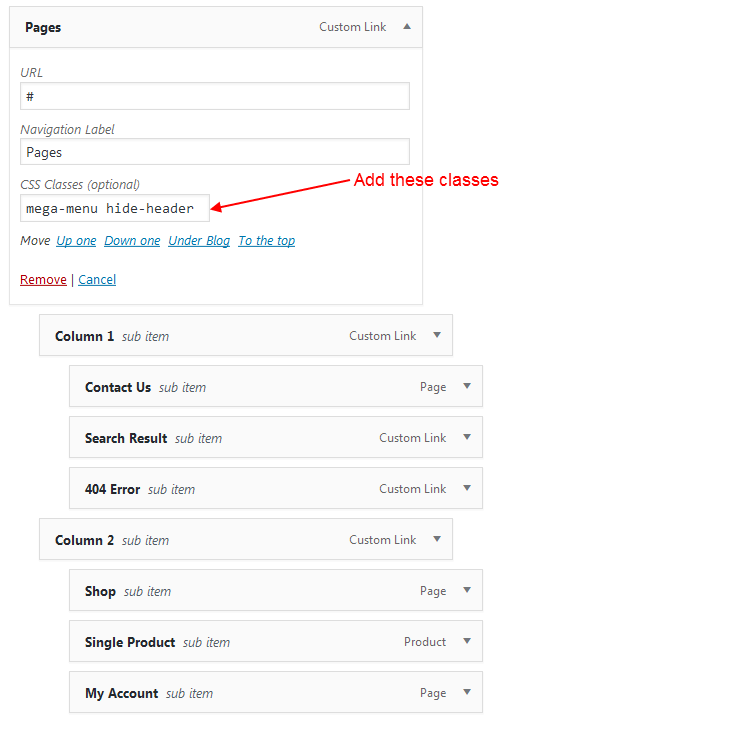
Here I used css class mega-menu which turns the submenu items into multi column. Also i used another class hide-header which hides the title "Column 1" and "Column 2" inside menu.
NB: If you can't see the field "CSS Classes", you have to enable it first. To do this, go to the top and follow this screenshot below:

4.9| Footer
To change the footer settings, navigate to Appearance -> Theme Options. Then go to Footer tab. It looks like this:
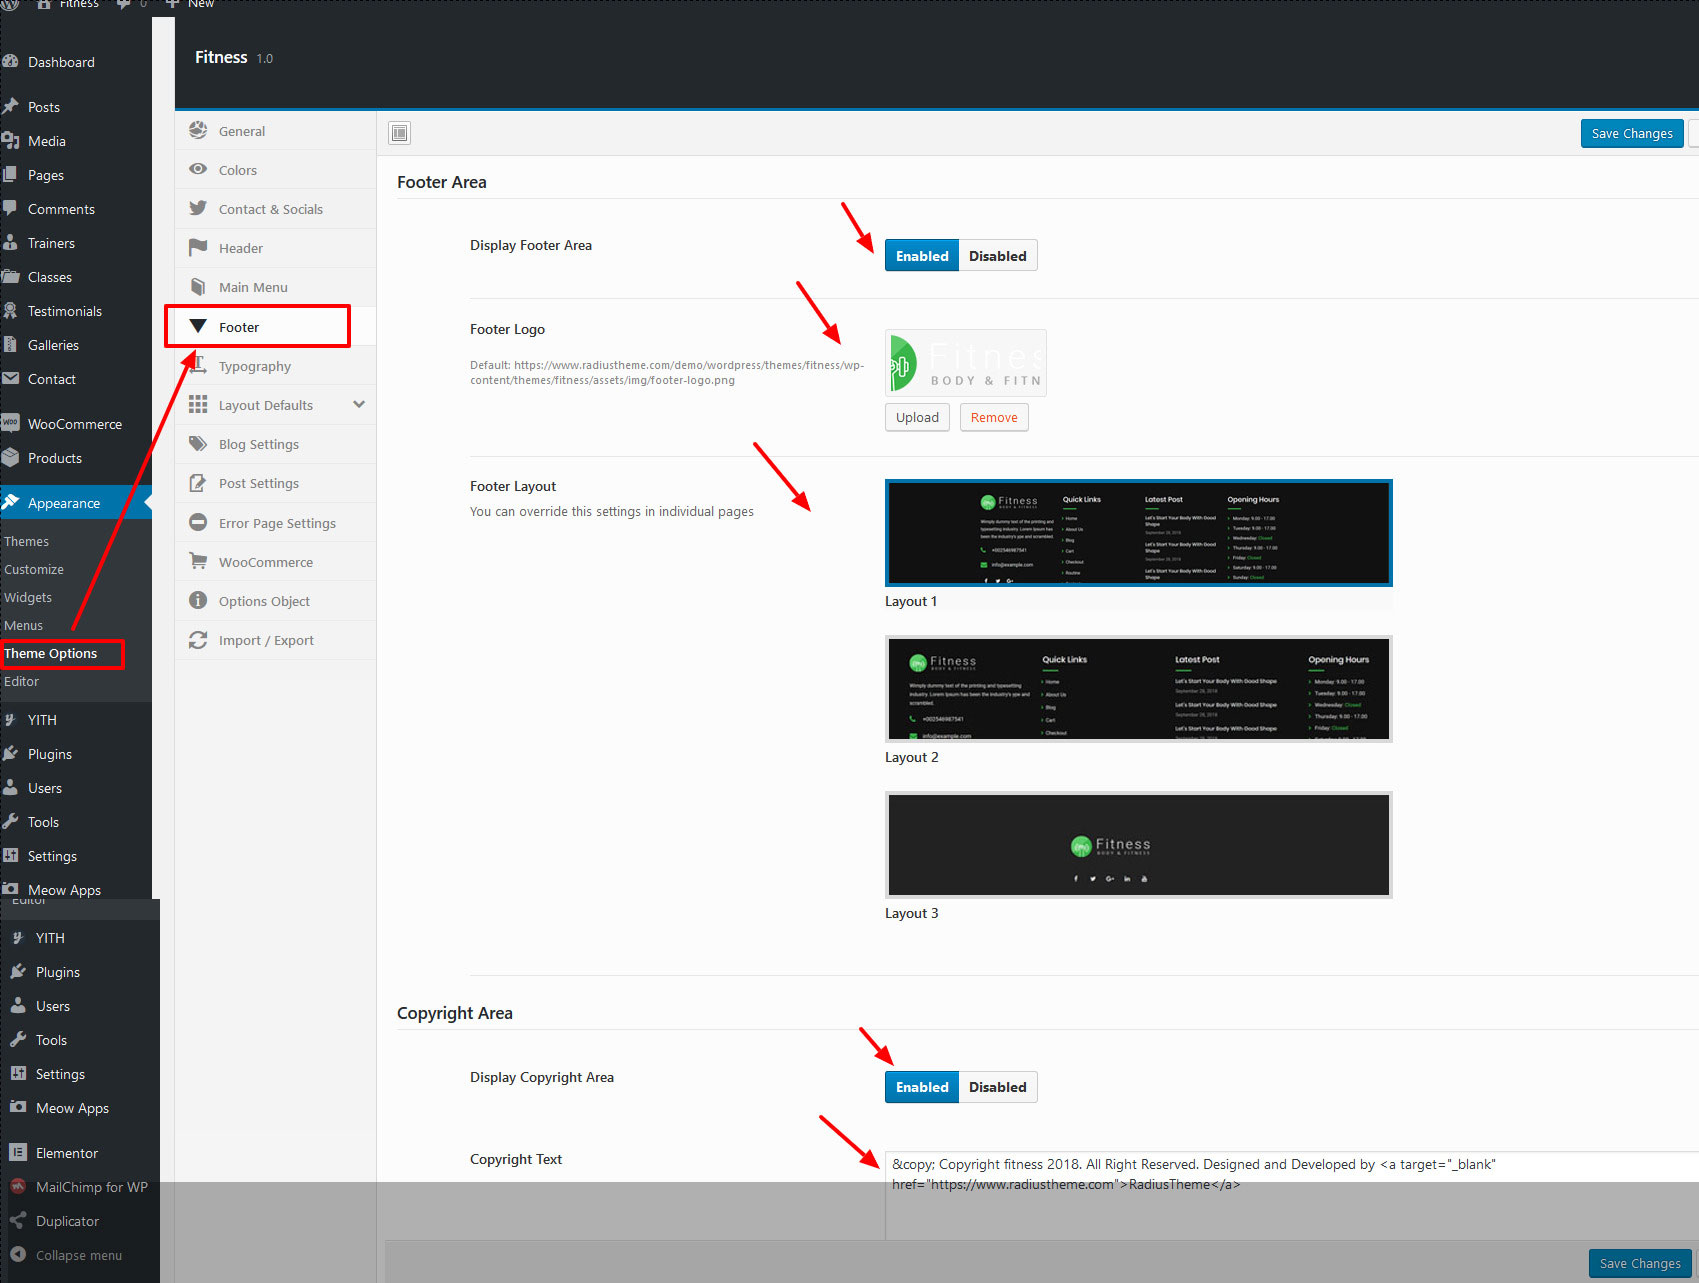
After changing the settings, Click on Save Changes button.
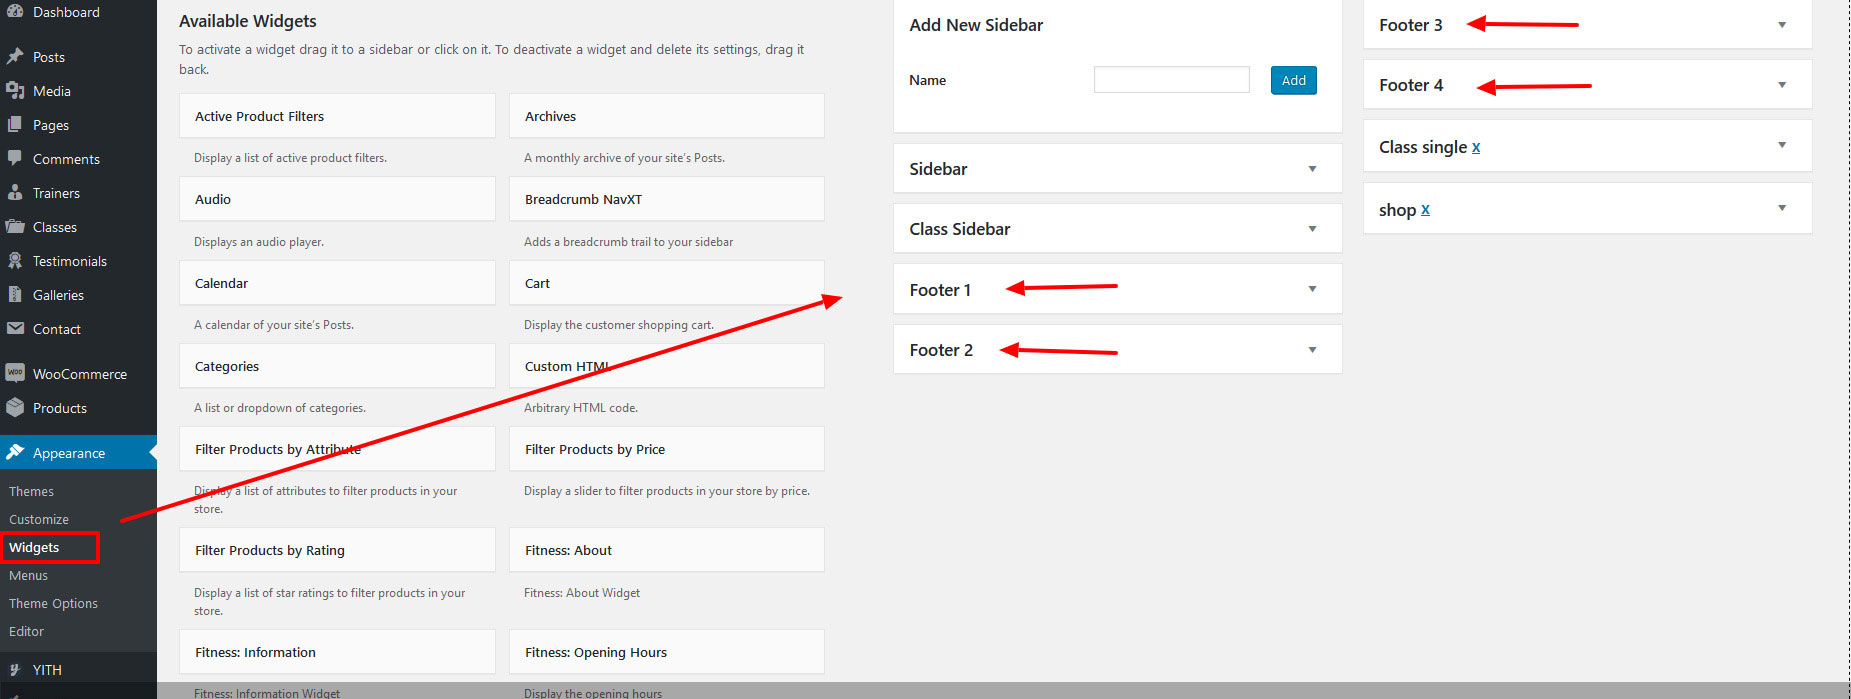
To set up footer widgets, navigate to Appearance -> Widgets. Here you can find available footer widget areas.
4.10| Typography
You can change the typography of Body and Headers. To do this, go to Appearance -> Theme Options. Then go to Typography tab.
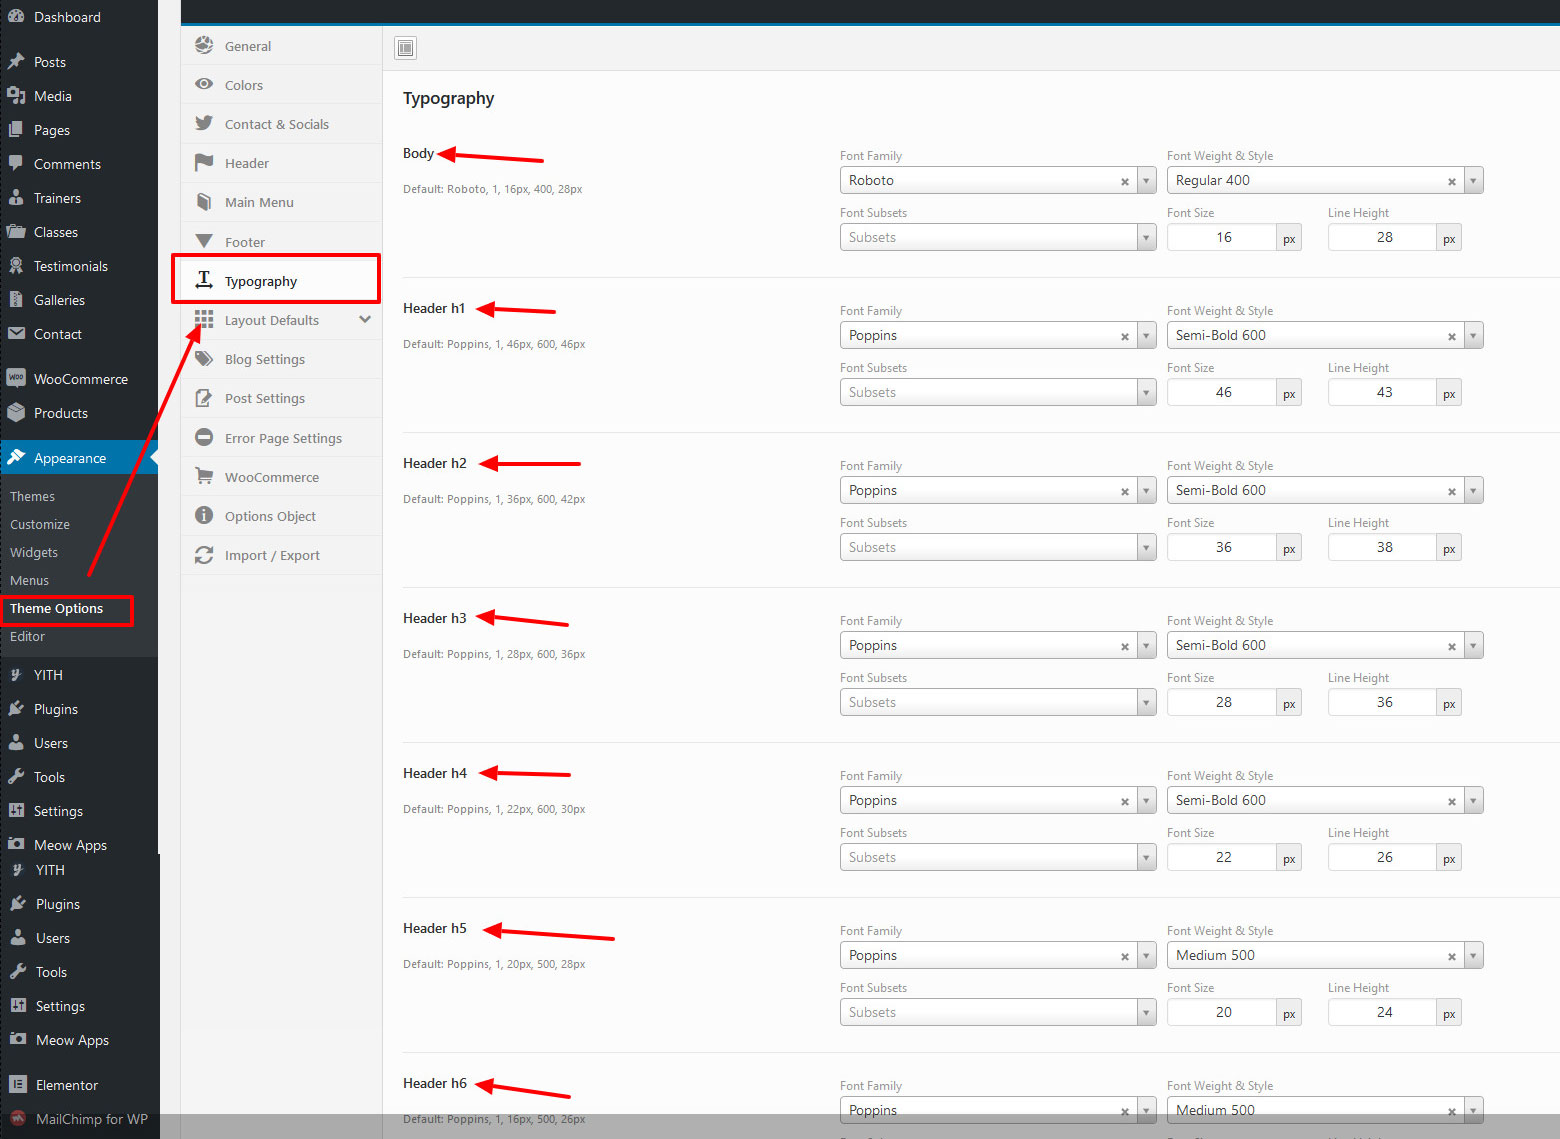
After changing the Typography settings, Click on Save Changes button.
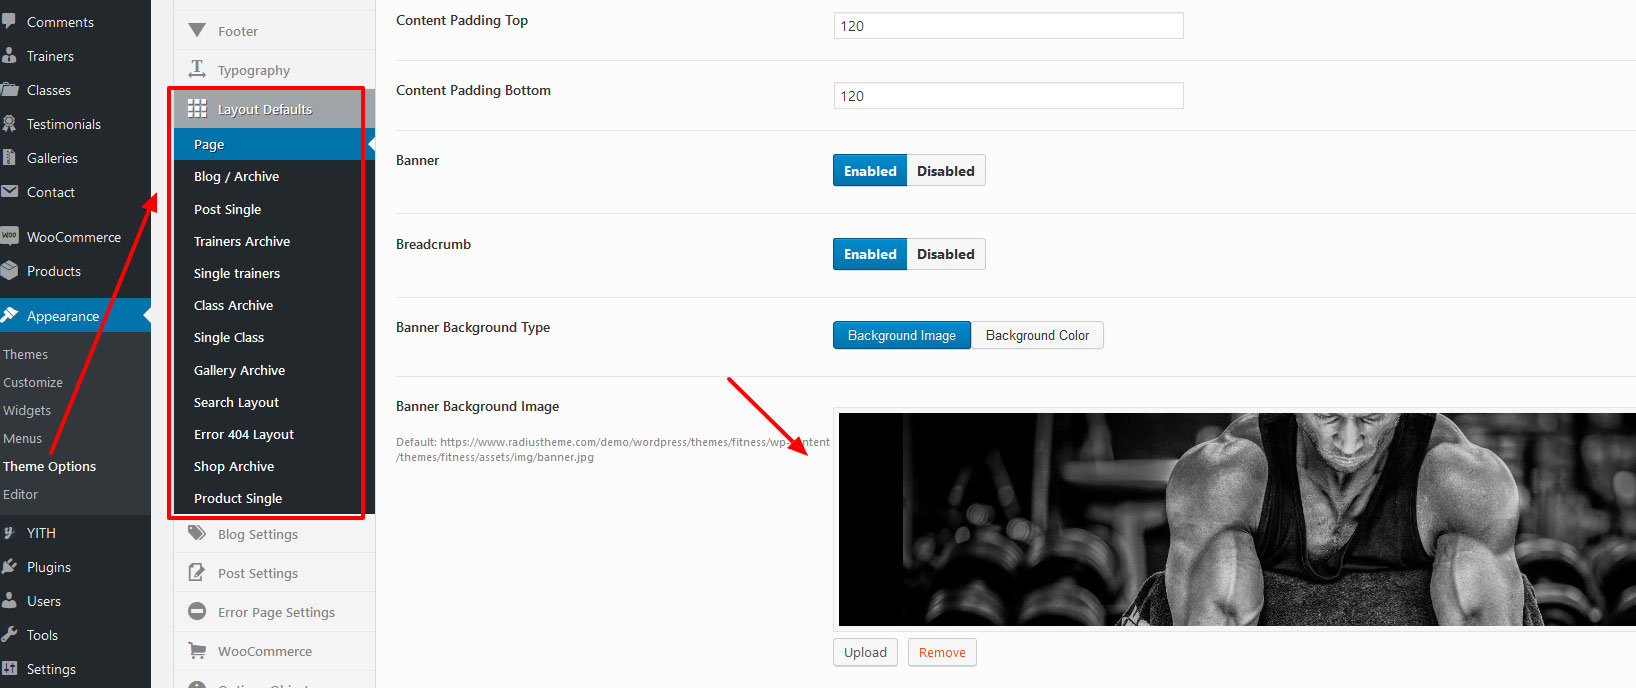
5| Layout Settings
From here you can set default layouts for pages, blog, posts etc. You can find this settings on Appearance -> Theme Options and then Layout Defaults tab.
This settings is similar for all submenus under "Layout Defaults", so for convenience i'll just describe for one item (Pages).

Layout: You can choose various layout types for pages eg. Left Sidebar, Right Sidebar, Full Width.
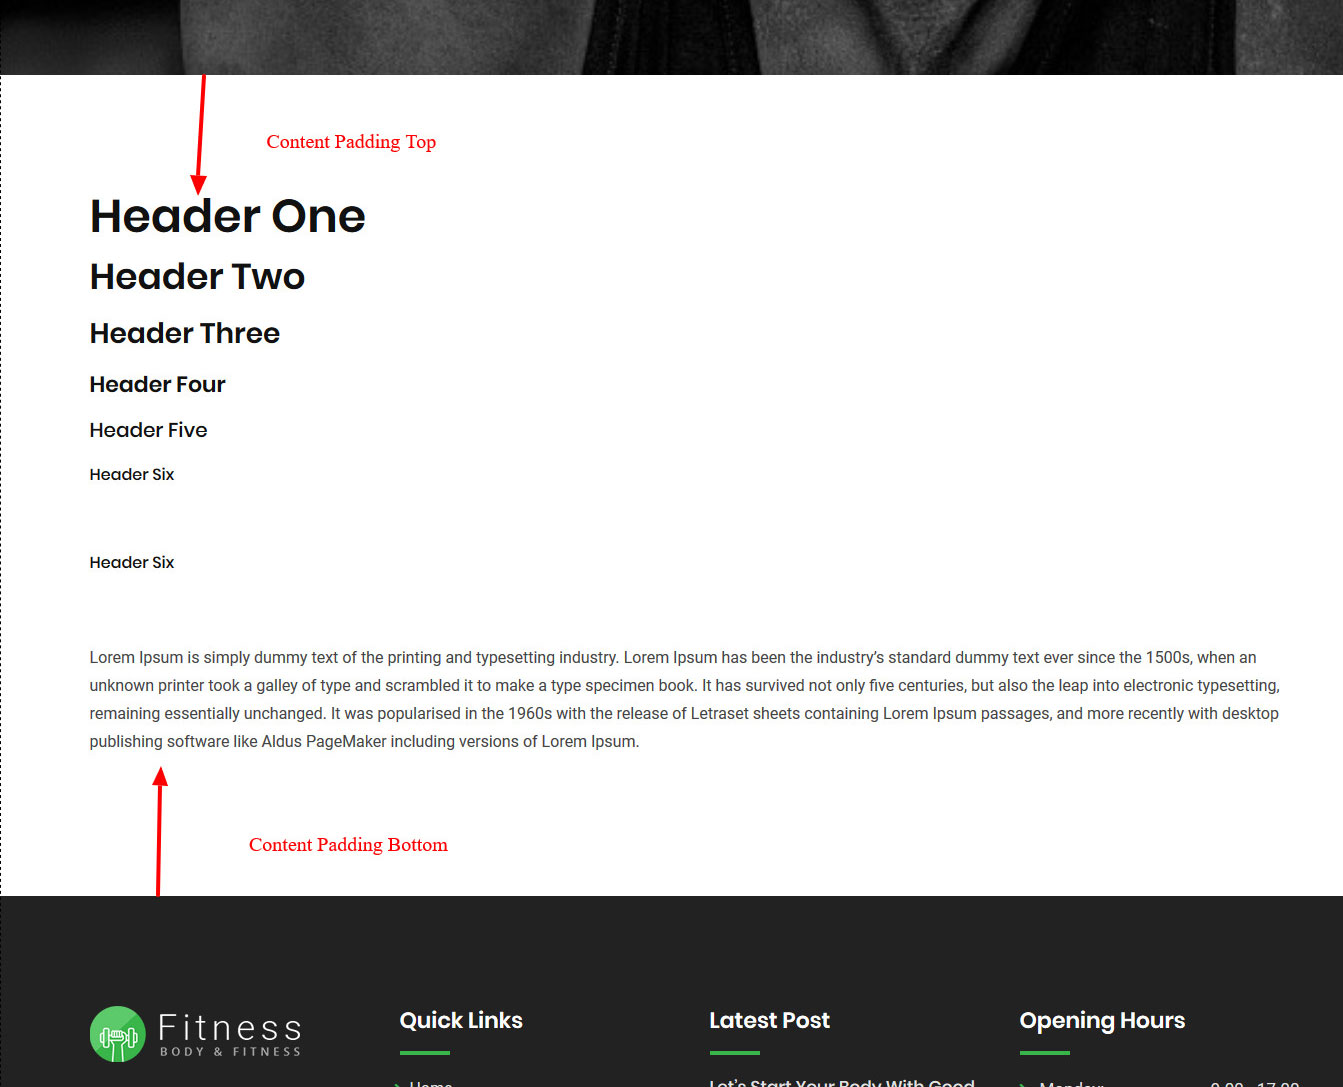
Content Padding Top: Paddings at the top of page contents. (see image below)
Content Padding Bottom: Paddings at the bottom of page contents.(see image below)
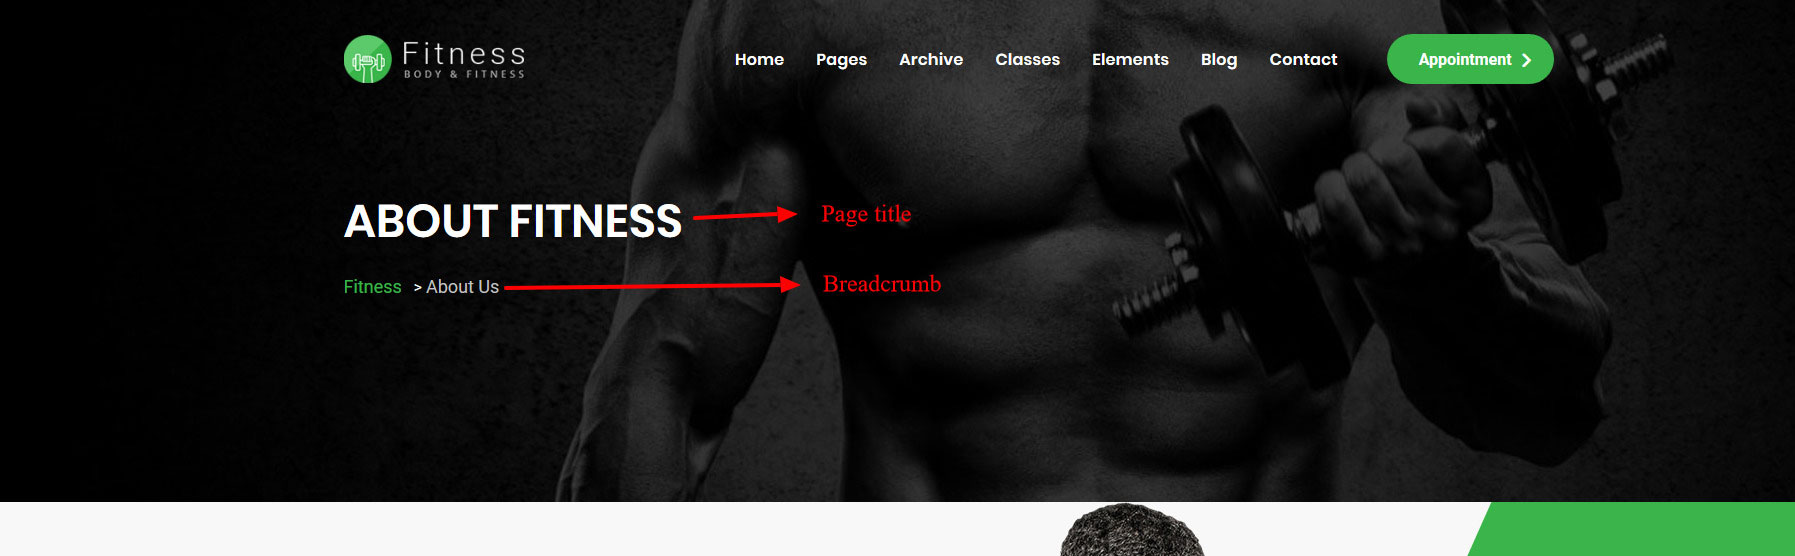
Banner: You can enable or disable banner (see image below).
Breadcrumb: You can enable or disable breadcrumb (see image below).
Banner Background Type: You can choose weather you want a background image or background color for banner.
Banner Background Color/Image: You can select the banner background color or image from here.
6| Layout Settings for Individual Post Types
You can override the above settings for individual post types. For any post types (like Posts, Pages, Services, Team, etc), when you go to Add New or Edit page, you can find similar settings like above under the "Layout Settings" box. If you change any settings from here, this will take priority. If you choose default, settings from the Theme Options -> Layout Defaults (described above) will be used.

7| Blog/posts Settings
Navigate to Appearance -> Theme Options. Then go to Post Settings tab. From here you can change Blog/Archive related settings.
Also you can upload an Inner Page Banner ImageAppearance -> Theme Options. Then go to General tab. It'll look like this:
After changing the settings, Click on Save Changes button.
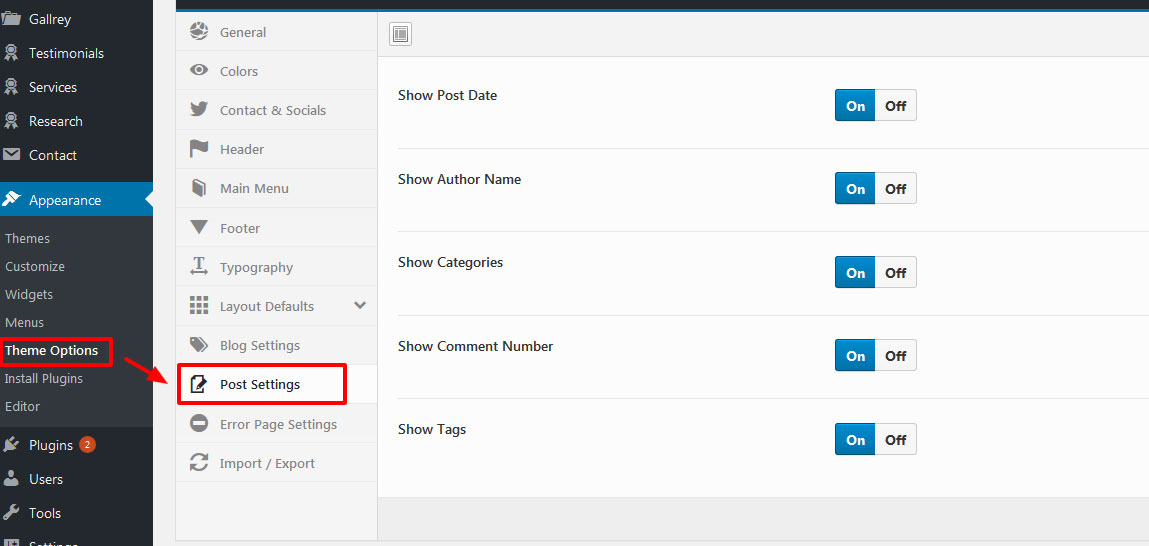
8| Post Settings
Navigate to Appearance -> Theme Options. Then go to Post Settings tab. From here you can change settings for single post .

After changing the settings, Click on Save Changes button.
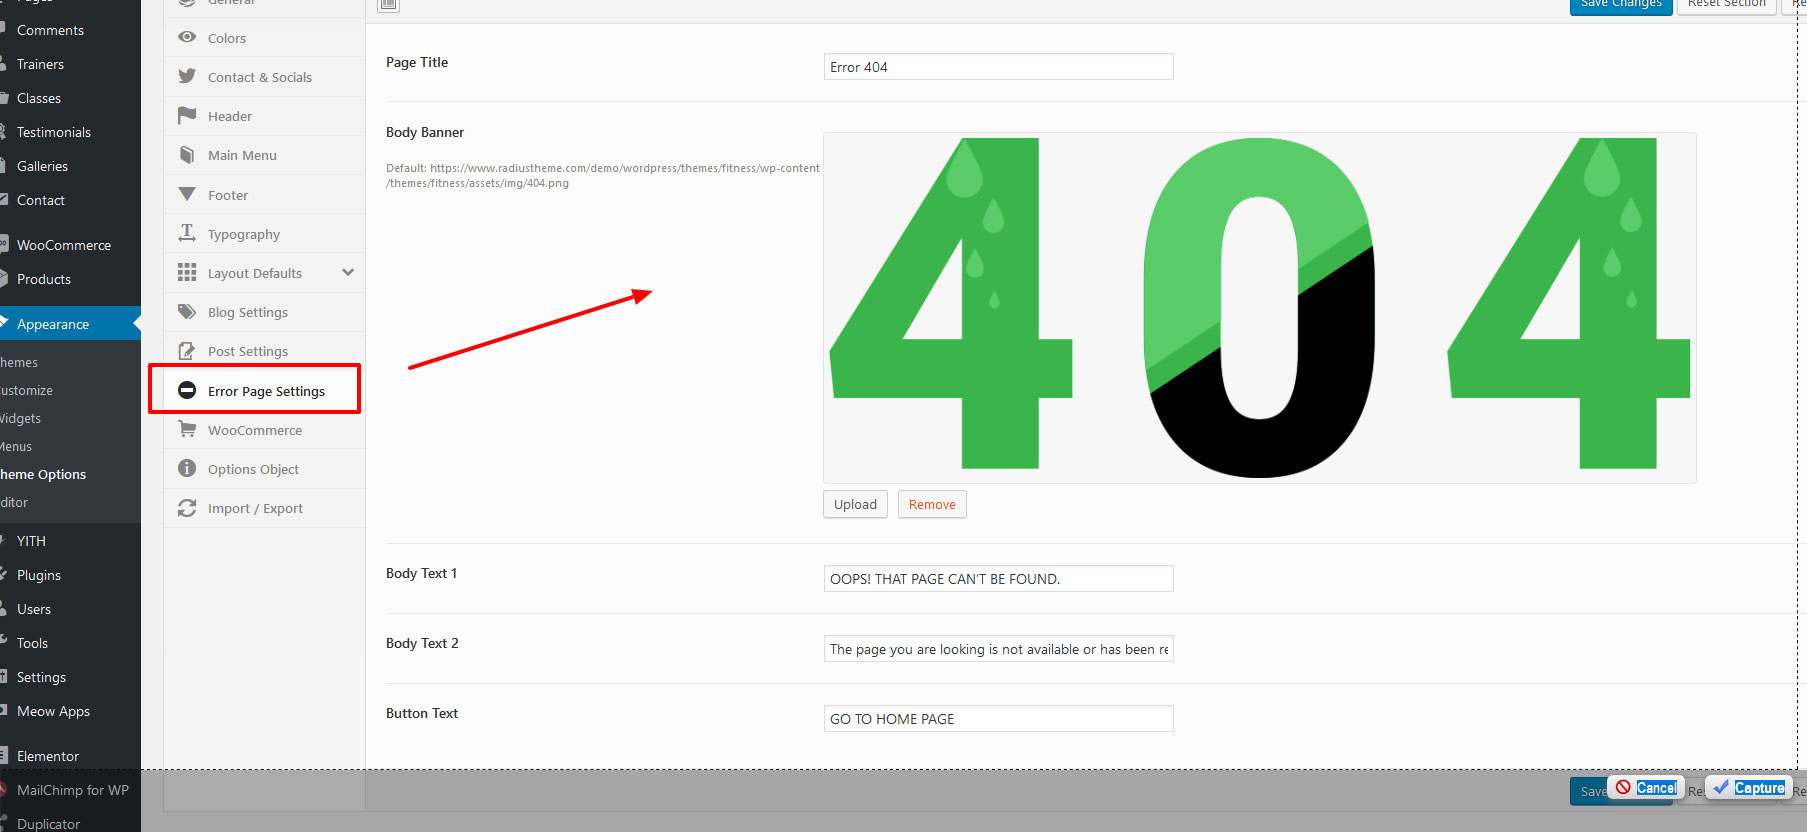
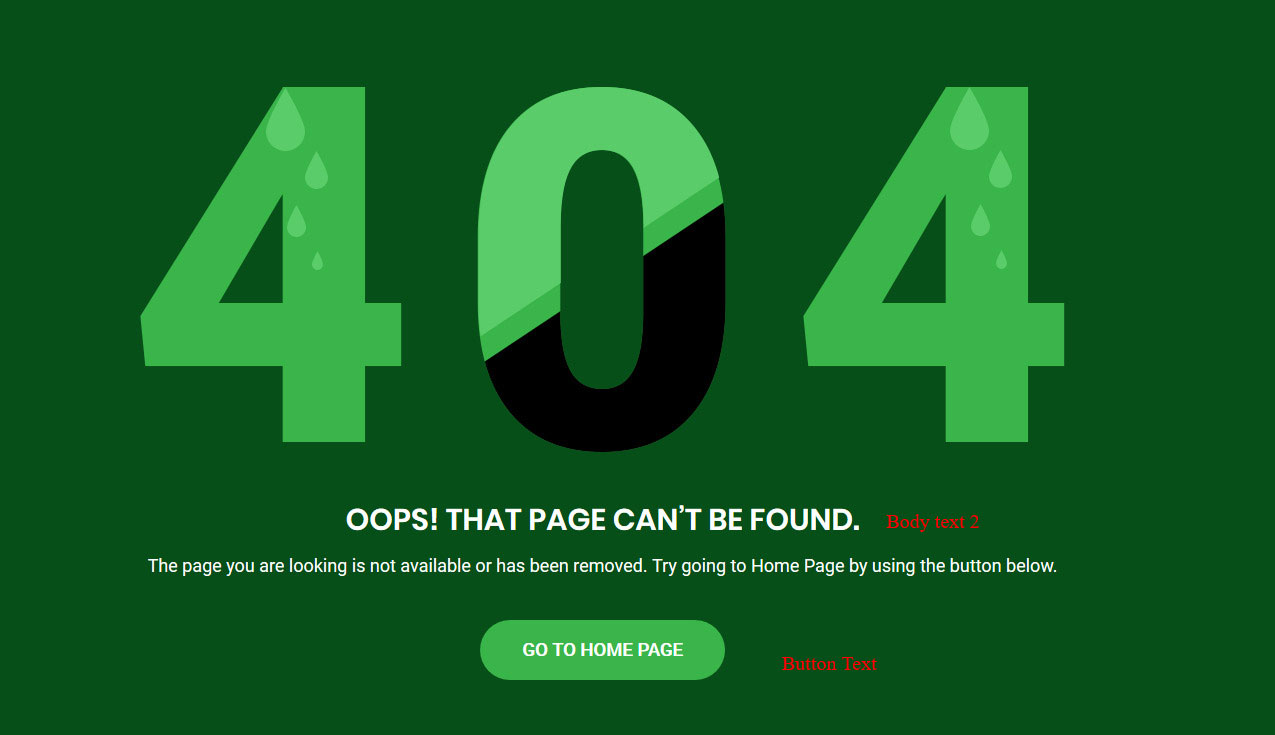
9| Error Page Settings
Navigate to Appearance -> Theme Options. Then go to Error Page Settings tab. Settings will look like this:
10| Breadcrum Setting for custom post type
You can set up root/archive pages for these Custom Post Types which will be used as breadcrumb. To do this, navigate to Settings -> Breadcrumb NavXT. In this page, Click on the Post Types tab.
Then select the root pages for Chef, Recipe and Event like the image below. It'll be used as archive page.

11| Trainer
You can add Doctor members from Trainer menu. For each Doctor you'll see the following settings:

For displaying Trainer, we have created Elementor elements for you. From Elementor, Go to RadiusTheme Elements Section, here you'll see Fitness: Trainer element.

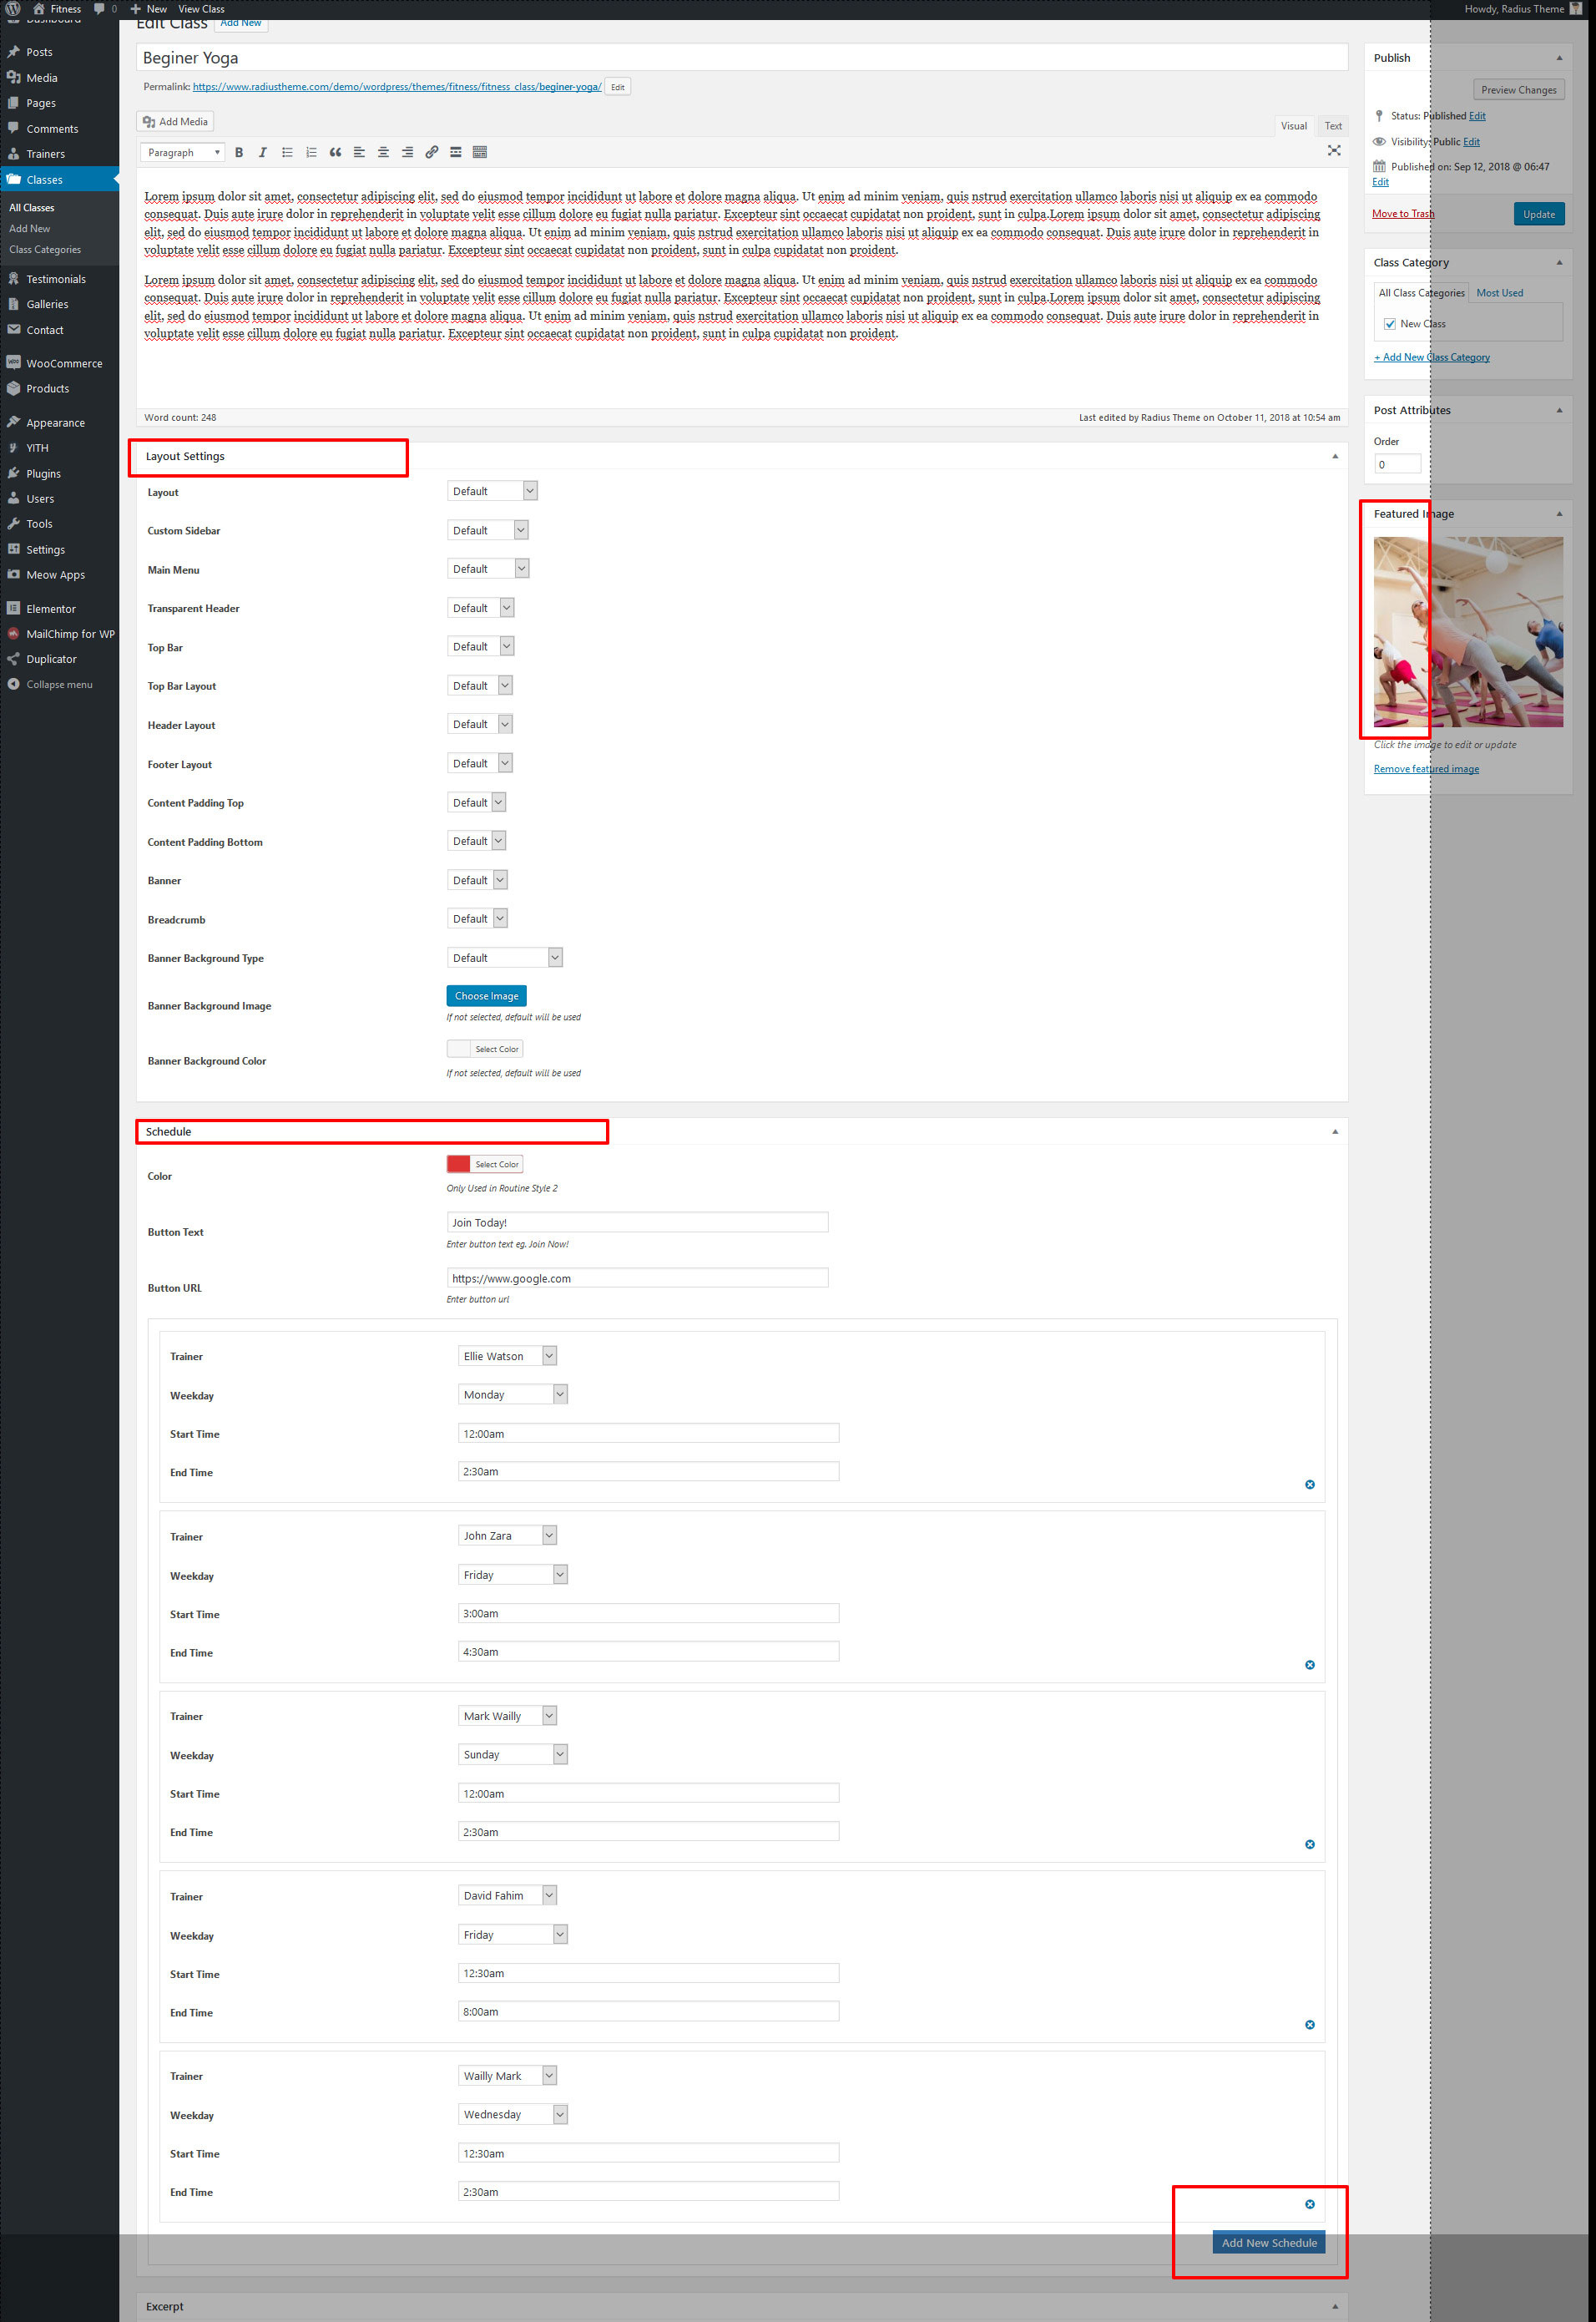
12| Fitness class
You can add class from class menu. For each class you'll see the following settings:
For displaying Event, we have created Elementor elements for you. From Elementor elements, Go to RadiusTheme Elements Section, here you'll see class and element.

13| Gallery
You can add Gallery from Gallery menu. For each gallery you'll see the following settings:

For displaying gallery, we have created Elementor elements for you. From Elementor elements, Go to RadiusTheme Elements Section, here you'll see Gallery element. 2 Style of gallery layout has been added

14 | Testimonial
You can add testimonials from Testimonials menu. For each testimonial you'll see the following settings:
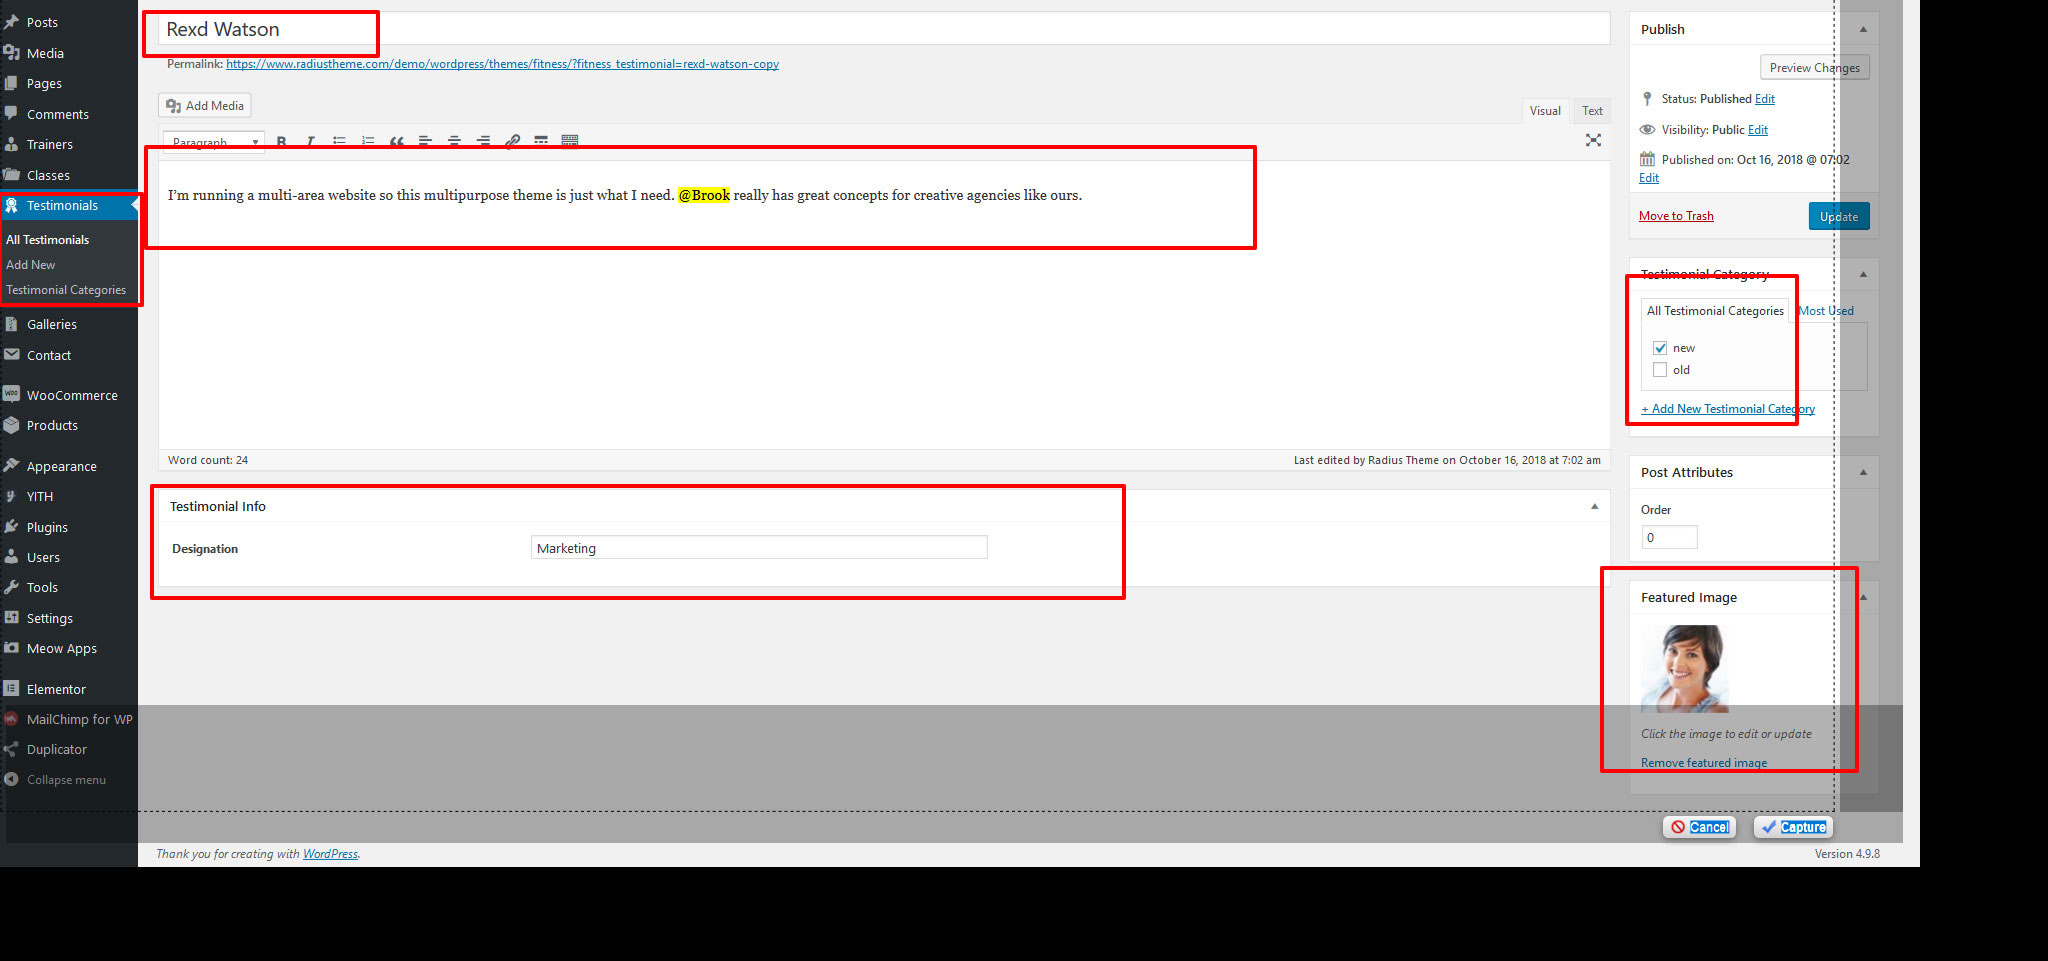
For displaying testimonial, we have created Elementor elements for you. From Elementor elements, Go to RadiusTheme Elements Section, here you'll see Testimonial element. 2 Style of testimonial layout has been added

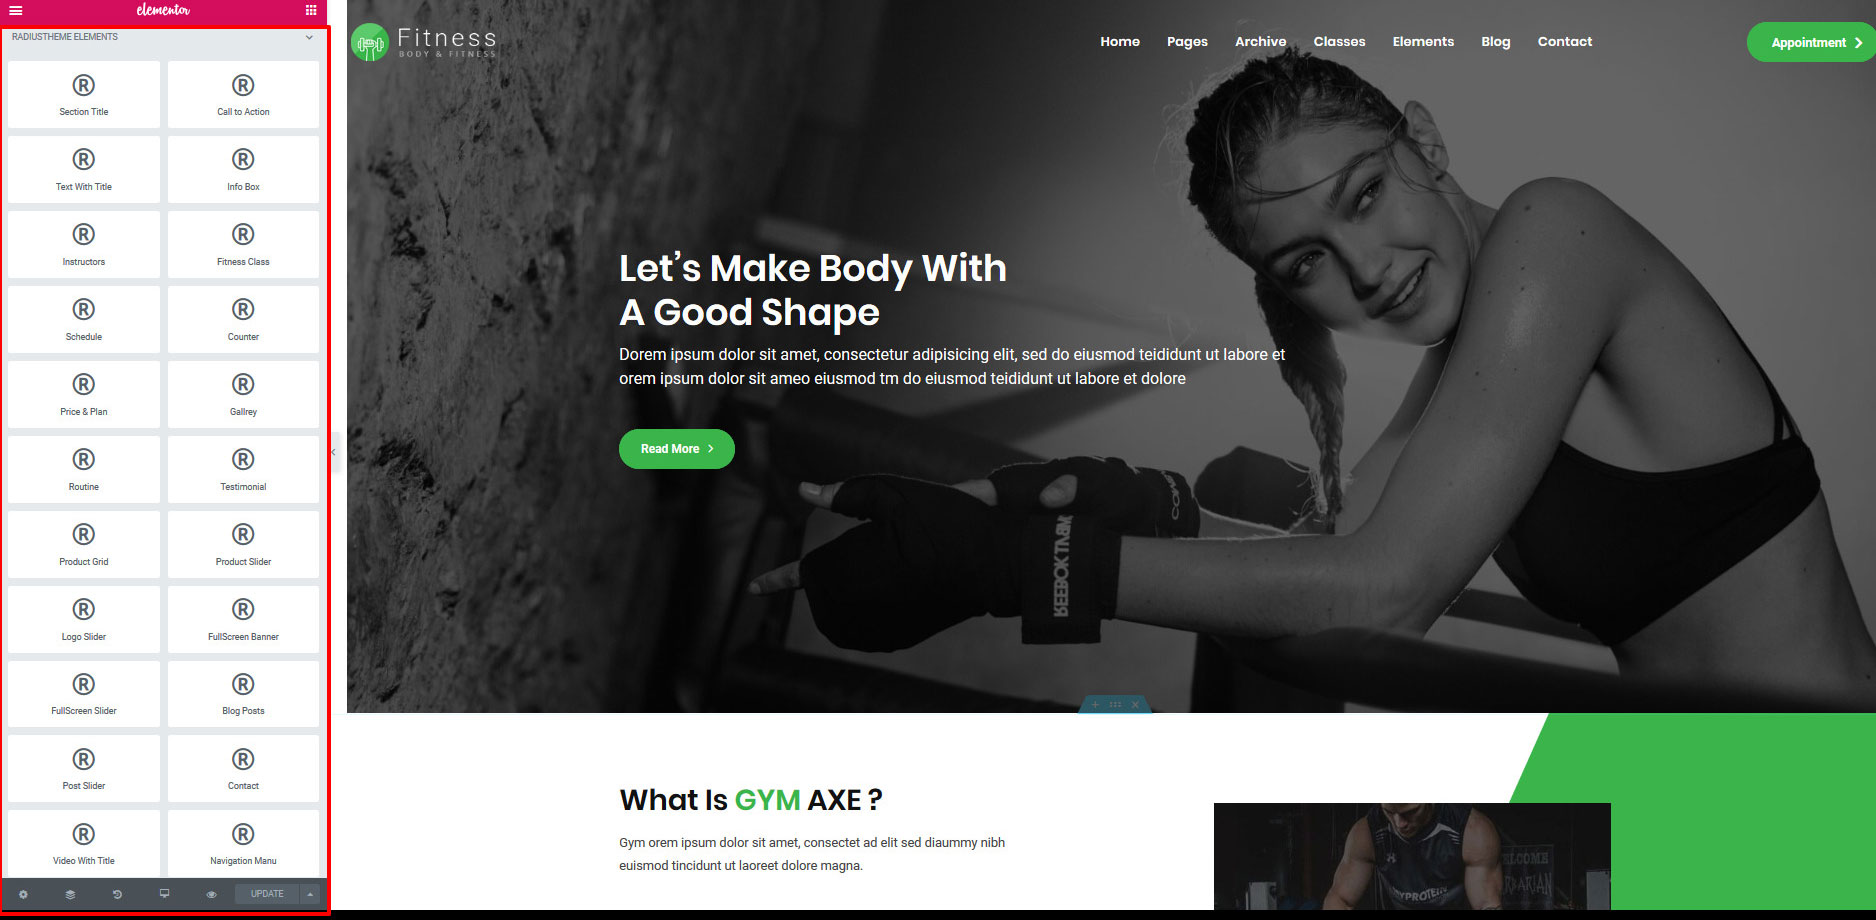
14| Elementor elements
We have created several Elementor elements for you. You can find them from Fitness tab in the Elementor elements
16| Built-in CSS Classes (Advanced)
You can use the following built-in css classes if needed:
- bg-primary: set primary color
17 | Custom Widgets
You can use the following Widget in any place of your theme ( like in footer & sidebar ). These are custom made

18.1| Setting up Contact Form
We are using plugin "Contact Form 7" for contact functionality. You can see their documentation for better understanding.
If you don't want to go through all the troubles to check their documentation and just want to use the default contact form we provided with this theme, please at least set up the default emails in contact form settings. (Because if you don't do that, all form submission emails will come to us instead of you). To do that, please follow the steps below:
Step 1: Navigate to Contact, and then click on Contact form 1 link.

Step 2: From this page, click on Mail tab. Here you should set your own email address where you want to receive user submitted forms. Then click on save button.

Step 3: Please submit some dummy forms from Contact page to make sure that it's working properly.
18.3| Translating Theme
You can translate this theme to another language easily. You actually have to translate two things for your website to work properly: "Fitness" theme and "Fitness Core" plugin. This plugin plays a major role in theme functionality, so if you don't translate this plugin along with the theme you can't be able to get the full translation.
There are many tools available for translation. But the easiest way is to use plugin "Loco Translate". Using this plugin, you can literally translate any WordPress themes or plugins if it supports translation.
** Note: Please remember, if you update the theme later your translations might be gone if they are stored inside theme/plugin. So please keep a backup of Fitness theme and Fitness Core plugin first before updating theme. **
Here's a quick video tutorial about how to use Loco Translate:
18.4| Updating Theme
Occationally we provide updates which includes new features and bugfixes. Updating WordPress theme is standard WordPress functionality. There are few ways to update WordPress theme. You can follow any of the methods described below:
** Note: Before updating, make sure to keep a backup of your website to be in safe side. **
Method 2: By Uploading zip File
- From WordPress Admin Panel, Navigate to Appearance -> Themes.
- Activate any other theme (eg. Twenty Seventeen) than the current one.
- Delete Fitness Theme.
- Now you have to upload the updated theme zip file. To do this, Navigate to Appearance -> Themes -> Add New -> Upload. Go to browse, and select the zipped theme folder. Hit "Install Now" and the theme will be uploaded and installed.
Method 3: By FTP
- Using your FTP client, navigate to "/wp-content/themes/" folder on your server and delete the "Fitness" folder from there.
- Now upload the latest non-zipped theme folder into that "/wp-content/themes/" folder .
21.1| Demo Content installation failed
This is a hosting issue. In most hostings demo installation will work fine. But some hostings block certain permissions which may cause this issue. If this happens to you, you can contact your hosting provider or alternatively send a support request to support@radiustheme.com and we will help you to fix this.
21.2| 404 Error in all pages
If you face this type of issue, please update your permalink. To update permalink, navigate to Settings -> Permalink and then click on Save Settings button.
22| Contact
If you face any issue, please contact at support@radiustheme.com
Thank you for purchasing our theme.