We have included the most important settings and controls of the Classified Listing Pro in this section Classified Listing=> Settings => Moderation. We have mentioned all the settings, step-wise to make them all clear for you.
General Settings
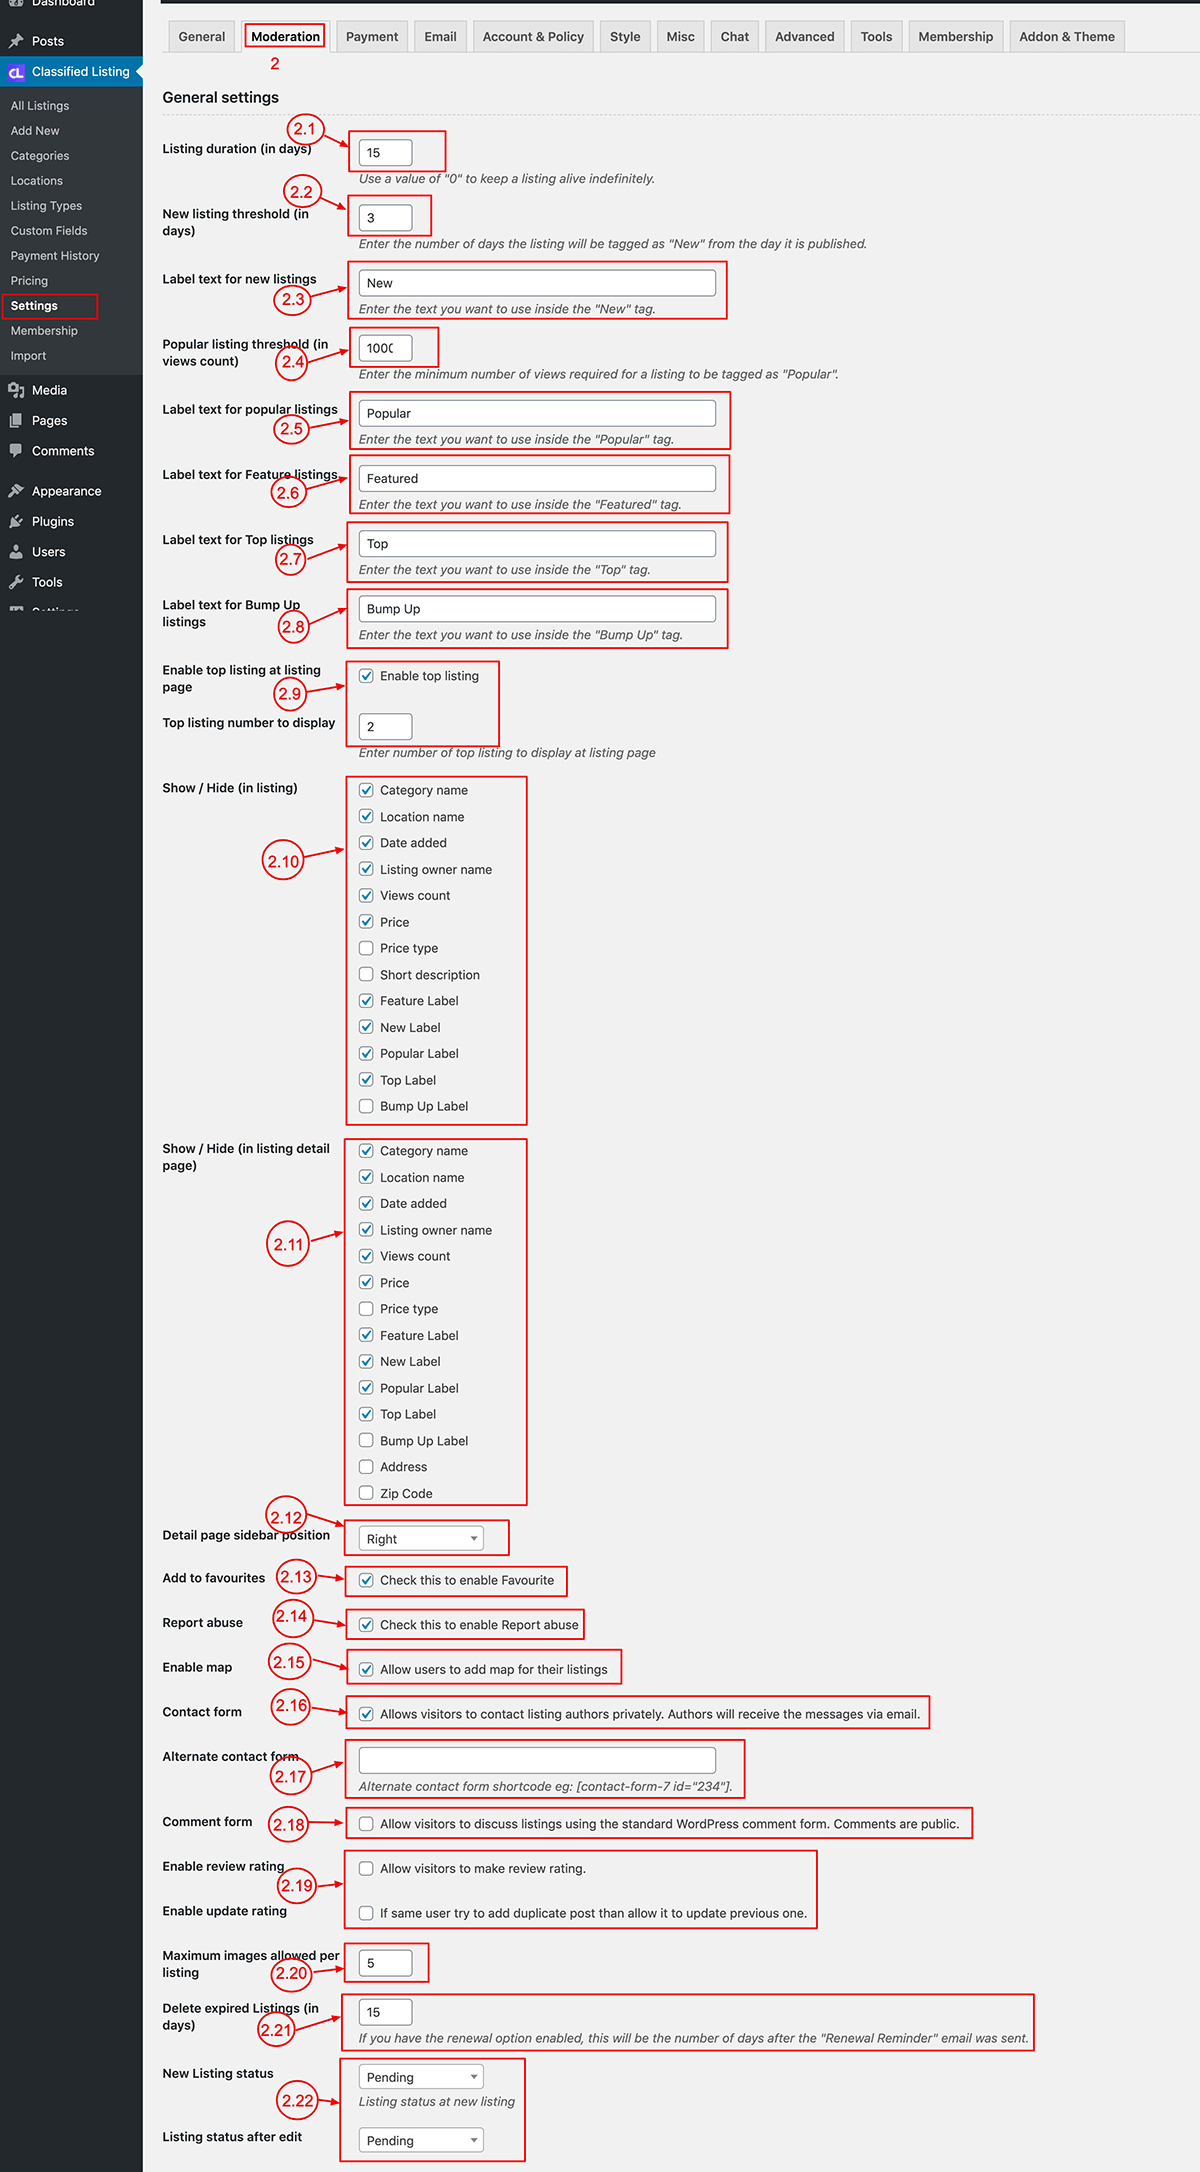
2.1) Listing Duration: Set the time limit or duration of the listing in days. For example, if you set the duration to 30 days, after 30 days listing the status of the listing will change from published to trash. So the listing will not visible on your site.
2.2) New Listing Threshold: Set the limit of days for which the listing will be marked as “New”. You can set whichever duration you want, for instance: 3 days.
2.3) New Listings Label: Set the label for the New Listing as “New” or whichever words you want to use. You can write whatever you want.
2.4) Popular Listing threshold (View count) [PRO]: Set the minimum number of views that a listing has to accumulate to be regarded as popular. You can set any number, for example, 1000. With this limit, if a listing gets 1000 visits or views, it will automatically be marked as popular.
2.5) Popular Listing Label [PRO] : Set the text label for popular listings as Popular, or set whatever text you want to have.
2.6) Featured Listing Label: Set the text label for featured listings as Featured, or just write whatever other text you want on your featured listings label.
2.7) Top Listing Label [PRO] : Set the text you want on the Top listing Label text as Top, or set whatever text you want.
2.8) Bumpup Listing Label [PRO] : Set the text you want for your Bumpup Listing Label text as Bumpup or just write your own text.
2.9) Enable Top Listing top of the list [PRO]: Check if you want to enable top listing top of the page & set how many want to display. This listing will be displayed at top of all ads and category pages. So Top listing then normal listing.
2.10) List view fields control: You can control the fields which you want to display. Just select to check the fields you want to display and uncheck the fields you don’t want to display in the list & grid view.
2.11) Detail view fields control: You can control the listing detail page field; just check/ uncheck the fields you want to display/ not display in the listing detail view.
2.12) Detail page contact info position: By default the listing detail page contact info is located on the right sidebar of the listing page. If you want it to appear at the bottom of your listing, you can set it from this setting.
2.13) Enable Favorites: If you want to enable favorites display option in front end then mark this check box. From front end the user can mark the listing as a favorite and then visit the favorites listing on My Dashboard menu.
2.14) Report abuse: Check this option if you want to enable the report abuse option. Therefore, from the front end visitor report to the admin via mail that the particular listing is abuse.
2.15) Enable Map [PRO]: If you want to use Google Map in your listing then check this option. You then need to set Google Map API key in the Settings=> MISC settings.
2.16) Contact Form: The contact form is shown in the listing detail page under the contact info section. Check this option to enable contact form. The buyer can send an email to the seller using this form.
2.17) Alternative Form: Instead of our default listing contact form we have the option to use any contact form plugin. Just use the shortcode of the form of the plugin and your site will show the form from the plugin.
2.18) Comment form: To enable comments in the listing detail page then check this option to enable comment form.
2.19) Enable Review Rating [PRO]: To enable review & rating in the listing detail page you need to check it then from front end user can post review & rating
2.20) Max image per listing: Set how many images a user can upload when they submit an ad from the front end. If you set 5 then each ad max can upload 5 images and in listing detail view it will be display as slider.
2.21) Delete expire Listing: Set the number of days after after the expiry of a listing when it will be deleted.
2.22) New & Edit Listing status: To control the publish status of a listing you can set it to pending from here after which the admin will need to manually approve the ad to publish it. If the setting is set to published, it will prompt auto-publishing of a new ad immediately upon submission — the same applies for Edit listing.
Listing Form
To control the Listing form fields and others settings follow this Classified Listing => Settings => Moderation to the bottom.
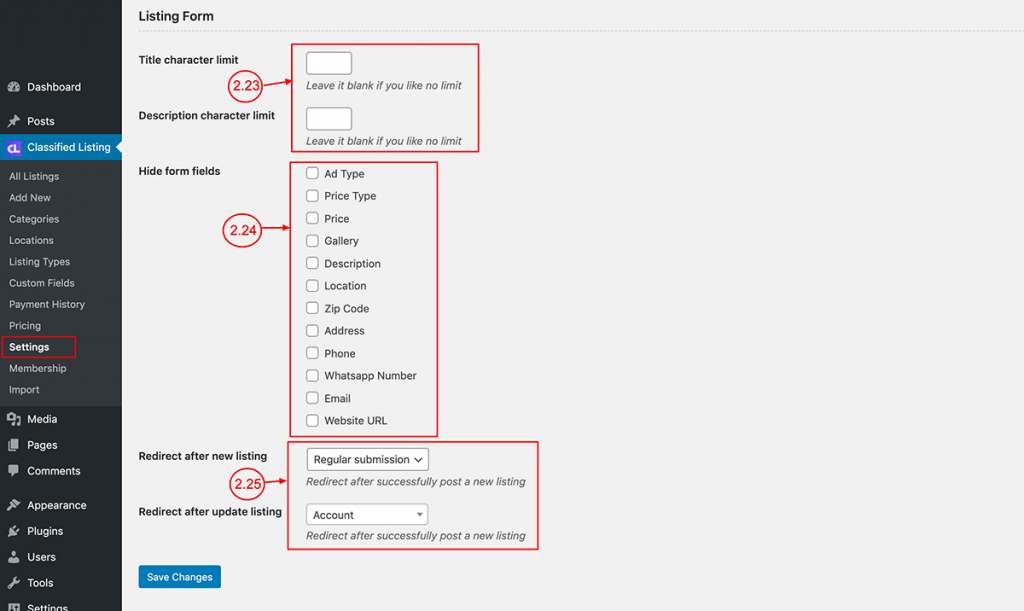
2.23) Title & Description Character Limit: In the ad submission form, you can control the title and description field character limit to change the length of listing title & description.
2.24) Hide Form Fields: To hide the default ad submission form fields, check the fields that you want to hide.
2.25) Redirect after submitting an ad: From this setting, you can set change the default redirect option to a specific page or any custom page.
Redirect after update lusting: By default after editing, a listing it will go to My Account Dashboard page. You can change this page if you want.